Tuesday, March 25

Artichoke Revelation

Seriously, the Romans are very proud of their artichokes, and we just happened to be there during the peak of artichoke season! Artichokes were everywhere, and the Romans have figured out every possible way of preparing them!

I will go ahead and admit that I have limited artichoke knowledge. I grew up in Texas eating them steamed, dipped in a garlic, mayonaise, lemon juice and melted butter concoction. You know the drill, peel off a leaf, dip it and scrape it with your teeth. Get down to the heart and spend at least 20 minutes removing all the artichoke 'fur', and then dip that into the now cold butter mixture and eat it as well.

This has been my tried and true artichoke method and, up until Rome, it has worked for me.

So, the owners of the apartment we rented in Rome are Pietro and Marina. They go out of their way to ensure that their guests experience the BEST of what Rome has to offer, so me being me, I asked about typical Roman food. One thing leads to another, and Marina makes a phone call to Pietro and next thing we know, we have a real live Roman cooking night set up!! I tell them I want to TASTE Rome, so naturally, artichokes are on the menu.

Pietro arrives with his rolling shopping bag full of goodies and proceeds to unload some gorgeous stuffed artichokes:


Pietro had made these before he got to the apartment, so I didn't get to participate in the creation, but I got to drool over them while he told me how he stuffed them, but unfortunatly, I don't remember what he told me, except for parmesean, walnuts and some other delicious things:


I mentioned in passing that I would love to learn how to make the fried artichokes I had been seeing around Rome, so Pietro marched us out of the apartment to the fruit and vegetable market across the street where we found these:


I just love the way artichokes look, but apparantly, that is NOT how they come! Pietro said something in Italian (of course) to the adorable little man who worked there and he disappeared into the back and came back with this:


Isn't he so cute?? I think he didn't know what to say when I started snapping away with my camera, but he was so sweet and nodded enthusiastically when I kept saying 'Grazie, Grazie'.

Another thing I learned, embarassing I know, is that artichokes do NOT grow from trees. They grow up from the ground on large stalks! I didn't REALLY think they grew on trees, but honestly, I didn't know cause I have never given it much thought.

So, here was our chosen specimen:


As mentioned earlier, I have never done anything more than minor trimming and steaming of an artichoke. Pietro, however, took artichoke preparation to a whole different level. His hands were moving so fast, he cleaned that artichoke like noone's business. From what I could tell from the blur of hands and knife before me, he chopped off all the stems and stalk:


Next, he pulled off the majority of the outer leaves:


Then he chopped off its top, like so:


Next, he peeled the stem:


Finally he quartered it, and with a flick of his wrist, removed all the pesky artichoke fur from the heart:


So, that's it! Now we all can EFFORTLESSLY clean artichokes!
Then it was back to the kitchen, where we made a simple batter for the artichokes. Tipo OO flour, olive oil and water:


Simple.
Heat up some oil in a wok or large pan, and dip the artichoke quarters in the batter:


Then put them in the oil and fry them until they are nice and golden, like so:


Needless to say, we gobbled these up! Perfect dipped in a garlickly aioli or just eaten plain with a squeeze of lemon and sea salt!

I had so many artichokes, prepared so many different ways that night, it was a REVELATION.

Sitting there in Rome with my husband and sister and new friends, Pietro and Marina, drinking good Sicilian red wine and eating good Roman food, in that moment, life was perfect and I could not have been more content!

Monday, March 24

Mirabilia Urbis Romae ("Marvels of the City of Rome")

Well, we just returned from a week in the Eternal City, and after having been there, I can now fully understand the name. A few years ago we took a road trip through Europe and our itinerary included some bits of Northern Italy, specifically, Reggio Emilia, Parma, Modena and Turin.

My mistake was thinking that Rome would be like these places, just bigger.

Italy is a truly fascinating place, but Rome...Rome is in a league of its own.

My first impression was while looking out the airplane window upon approach. The Mediterranean sea was sparkling and everything was so GREEN, a nice change from the dark and snowy Oslo morning I had left a few hours earlier. My sister flew over from Texas and we all met at the airport and thus began our Roman Holiday!

So, we have all heard of the Colosseum. The Roman Forum. The Palantine Hill. The Vatican. The Dome of St. Peter. The Pantheon.

Let me assure you, hearing about them and seeing them in person are two completely different things.

It started with the apartment we had rented for the week. A hot tip for you: it is cheaper to rent an apartment than it is to stay in a hotel! Rome is NOT cheap! We got ours on vrbo.com!

So, we arrive at the apartment which is supposed to be 'near' the Colosseum. When they say 'near', who knows what that really means, in our case, we walked out onto our huge terrace and this is what 'near' meant:


Can you believe that view??

Our jaws hit the floor! The Colosseum was about 1000 meters away!

THE Colosseum!

In the distance, St. Peters Basilica. It was overwhelming. Directly in front of us, maybe 250 meters aways, a place called the Basilica of San Clemente. A church from the 1600's which sits on top of another church from the 4th century, which sits on top of a Mithraic temple from the first century. All of these layers have been excavated and you can work your way down through the centuries. Amazing. To the immediate left, the oldest monastery in Rome:


We sat down outside and drank our Sicilian red wine and absorbed the history surrounding us.

There is so much I could say on Rome, but I really just don't know where to begin. I have about 400 pictures, but there is no way to put them all here. Even if I could, they would be difficult to describe because so much of my experience of Rome was FEELING. Being overwhelmed. Being in AWE. All of this EXPOSED and VISIBLE history makes the mind and senses of this visually stimulated girl go CRAZY. Seeing stuff like this:


and this:


How is this stuff still standing?? Imagine it white and gleaming. A thriving society, so advanced and technically minded. Who could have even imagined that the Roman Empire could EVER NOT be the glorious center of the world?? I see things like this and I am perplexed. With these kind of structures and with that kind of society, how in the WORLD did the Dark Ages ever occur? It is mind boggling.

But this was what amazed me the most:


Those are just RUINS lying around!! Everywhere! Like tree branches or trash in any other city! Why don't they pick them up?? It just seems wrong to let chunks of thousand year old pillars lay about, doesn't it???

Simply unbelievable.

Sunday, March 9

Ravished by Ravioli!

Homemade pasta continues its reign in my kitchen with no signs of relinquishing its new found power. I would like to be clear that the power pasta has in my home is really an illusion, as I am the ONLY queen of my kitchen, but I am content to let it rule along side me, at least for a time.
So, I was talking to my brilliant geologist friend Cassie, and after having seen the previous post on pasta, she asked if I knew how to make ravioli. Well, one thing led to another and suddenly we had a date for Saturday night to have a ravioli making evening.

Ravioli is one of those things that seems alot more intimidating than it actually is. You should know by now that I am not a fancy pants chef with a fancy pants kitchen and fancy pants accessories. I loathe watching 'chefs' who cook things that make the average person feel like they could NEVER recreate what they are making.

Food brings me joy. Finding inventive ways of preparing and creating foods makes me GIDDY.

So, that being said, you don't need a ravioli ATTACHMENT to make gorgeous ravioli. You don't need a ravioli FORM to make those tasty filled pillows of goodness.

All you need is a 2 dollar pair of crafting scissors from Hobby Lobby.

YES! CRAFTING SCISSORS. You heard it here first on the beautiful diabetic.

Let me show you just how easy making awesome looking ravioli can be! I promise you will be amazed.

So, Cassie and I decided on making two types of ravioli. One stuffed with your basic cheese mixture and the other stuffed with homemade spicy Italian sausage and mozzarella. To make the cheese stuffing, simply mix together ricotta cheese, fresh grated parmesean, fresh basil, oregano, sea salt and cracked pepper.

I try to keep things on the healthy side here on my blog, so for the Italian sausage, take a lean pork chop, trim the fat, throw it in a food processor and pulse it until it is totally mutilated.

I am all for anything that makes creating good food easier, I am not going to hand mix my Italian sausage seasonings, especially when Penzey's spices has already done it for me:


If you go to their website, you will be amazed and will end up ordering stuff. Great quality, great prices, great combinations! Check it out!

So, put the pork in a bowl, add some crushed red pepper and a tablespoon or so of the Penzey's spice mix. Use your hands to mix it up and fry it up with a little bit of olive oil, and set it to the side to cool, when it is cool add some shredded mozzarella and any leftover ricotta.

Once you have your chosen fillings ready to go, make your pasta dough. Divide it into 4 balls and roll them out into long sheets.
Take one of your pasta sheets and lay it flat on the counter top. I like to start with the cheese filling, so any of the left overs we can put into the meat mixture to give it a little moistness. So, take about a heaping teaspoon of the cheese filling and drop it on the pasta sheet, I can't really explain it well, so here is a visual:


You get the idea? Kind of make them caddy cornered to each other. Remember that you are going to need enough room between each one to cut it into ravioli!

When you have your cheese all spooned out, take another sheet of the pasta and gently lay it over the other:


Ok, so now, gently press the dough around your lumps of cheese. You want to the two sheets of dough to touch in as many places as possible. This will make your cutting easier! So, it should now look like this:


Ok. Time to grab the aforementioned crafting scissors!!! This is the fun part, if you can make a scrapbook, you can make ravioli! If you are unsure what kind of scissors I am talking about, it's these kind:


Any scissor that makes those crazy patterns will do. I have found that when you start cutting the dough, the shaped FLAT edges of the crafting scissors will actually SEAL the ravioli as you cut AND will give you cool edges!! So, pick up an end of the dough and start cutting out your ravioli!


No need to be perfect, just get one cut out and then trim the edges:


And suddenly, you have perfect ravioli:


Amazing, huh??

CRAFTING SCISSORS!!!!

Just continue cutting and shaping and then repeat the whole process with your sausage and mozzarella mixture!

For the sauces, Cassie and I decided on a basic marinara sauce for the cheese ravioli and a low fat (aka totally fake and not authentic) alfredo sauce for the sausage ravioli, which is basically a dressed up bechemel sauce.

Now, bring a pot of water to a boil. I should mention that you need to give your craft scissor ravioli a once over and look for any oozers. An oozer is a ravioli who has an unsealed edge. If you don't squeeze these back together, your filling will OOZE out into the boiling water. Once the oozer check is complete, gently put your raviolis in the water:


They will not take long to cook. Basically, when they float to the top, let them cook for about 1 minute longer and then remove them with a slotted spoon.

For the cheese ravioli, top it with some marinara:


For the sausage ravioli, a little of the faux alfredo:


So, now for the all important taste test. The cheese ravioli was awesome! The combination of the marinara and the ricotta was really perfect:


Next we tried the spicy Italian sausage and mozzarella. I really was enjoying it, but then Cassie announced that it reminded her of sausage and biscuits:


Not exactly the review I was looking for, but I had to agree a little with her. There was a distinct similarity to what I was eating now and what I had eaten at Cracker Barrel on several occasions in the past.

So I think we all learned a valuable lesson here: Don't use a flour based sauce and try to sneak it over on people as a proper alfredo sauce! Just splurge and use butter and cream.

Alas, our ravioli journey has come to its end, with overall GREAT results!

And to think you thought your crafting scissors were only good for paper!!

Tuesday, March 4

Flour + eggs = PASTA

Last week I was watching Jamie Oliver and his new show, 'Jamie at home'. I think it's in its second season in the UK, but it is new for us here in Norway. It's my favorite Jamie Oliver show thus far. He has this cottage out in the country where he has a HUGE garden and a hippy gardener called Brian.

Every week he picks something from the garden or farm to make stuff with: eggs, root vegetables, fowl, lamb, greens, ect. Well, last week, Jamie was making things with eggs. Not just any eggs, but free range organic eggs. But before he got to the cooking, he gave us all a lesson in why eating eggs from caged chickens is really inherently evil. To illustrate his point, he took a chicken, whom he had heroically adopted to come live in freedom at his little farm and join the free range chicken flock, out of its cage, and the chicken just stood there, not moving a muscle.

IT DIDN'T KNOW HOW TO RUN! And the comb on top of its little chicken head was really anemic looking when it should have been vibrant red!

The lesson was for us to always buy free range chicken eggs.

But do what you want.

So, with his eggs, he was going to make pasta. I love homemade pasta. Last Christmas Christopher gifted me with a stainless steel pasta maker. I was in pasta heaven for months and we used it often. When we moved last summer, it got put away and I had really kind of forgotten about it.

Until Mr. Oliver and his free range eggs.

So, lets make pasta!

I just followed Jamie's basic pasta recipe:

100 grams of flour per person
1 egg per 100 grams of flour. I used Tipo '00' flour. It is an Italian pasta flour. Look for it in your grocers baking section.

I have made pasta 2 times in the last few days, one batch of plain and one batch of spinach, so the photos are mixed together a bit!

Put the ingredients into your food processor and pulse it until it resembles crumbs. Pour it out on a floured surface and knead the heck out of it.


Once your dough is smooth, break it into 4 different pieces and get ready to roll it through your pasta machine. I find it a bit difficult to give you good directions, so I will just copy and paste the instructions from Jamie Olivers website:

"Dust your work surface with some Tipo ‘00’ flour, take a lump of pasta dough the size of a large orange and press it out flat with your fingertips. Set the pasta machine at its widest setting - and roll the lump of pasta dough through it. Lightly dust the pasta with flour if it sticks at all. Click the machine down a setting and roll the pasta dough through again. Fold the pasta in half, click the pasta machine back up to the widest setting and roll the dough through again. Repeat this process five or six times. It might seem like you're getting nowhere, but in fact you're working the dough, and once you've folded it and fed it through the rollers a few times, you'll feel the difference. It'll be smooth as silk and this means you're making wicked pasta!


Now it's time to roll the dough out properly, working it through all the settings on the machine, from the widest down to around the narrowest. Lightly dust both sides of the pasta with a little flour every time you run it through. When you've got down to the narrowest setting, to give yourself a tidy sheet of pasta, fold the pasta in half lengthways, then in half again, then in half again once more you've got a square-ish piece of dough. Turn it 90 degrees and feed it through the machine at the widest setting. As you roll it down through the settings for the last time, you should end up with a lovely rectangular silky sheet of dough with straight sides - just like a real pro!"

See how easy Jamie makes it sound? When you have a long sheet, flour it a bit, fold it in half, then in half again, so it looks like this:


I used to roll the sheets through the cutting mechanism of the machine, but Jamie's method is much easier. Just CUT it!!


After you cut the pasta, pick it up and use your fingers to separate the strands:


Here are your two different kinds of pasta after they have been cut and tossed:
Plain egg noodles:


Spinach egg noodles:


For the plain egg noodles, I made a gorgeous pasta carbonara on Friday night:


And tonight, I made an equally gorgeous bolognese sauce for the spinach pasta:


There is no telling when my current pasta obsession will end. It is one of those things that I think is really amazing, to start out with flour and eggs and end up with perfect noodles! Noodles that I made! From scratch!

It is magical!

Saturday, March 1

The Bagel Woman Cometh...

As is typical of me, the craving demon hit me at some point last weekend, Saturday evening to be specific. I couldn't tell you what triggered it, but suddenly, I HAD to have bagels. It might have been residual craving left over from the Reuben episode a few weeks earlier. I don't know. It doesn't matter.

All you need to know is that I had to make bagels. So, let's make bagels shall we?

So, I hopped on over to Recipezaar, you know, where the worlds recipes are, to look for a bagel recipe.

There were alot on there, so I found a basic one and, since I don't ever follow recipes, I proceeded to make it my own. I wanted to make them whole grain, with a high fiber content, the ultimate goal being to make them as Weight Watchers friendly as possible! Those of you who follow 'the plan' will know what I am talking about- Anyhoo, these are delish and are only 2 points!


Basic Bagel Recipe:
1 1/2 cups warm water
2 packages yeast
1 pinch of sugar (to activate the yeast)
1 pinch of salt
3 1/2 cups flour- I used 1 cup of spelt flour, 2 1/2 cups of whole wheat flour. I also added flax seeds and about half a cup of oatbran.
2 quarts water , to boil
1 egg white

My bemused husband could only shake his head when I pulled out the Kenmore Pro mixer at 8pm, but I think you know by now, it had to be done.

First, put the water and sugar in the bowl of a mixer and let the sugar dissolve. Add the yeast and let it stand til it gets frothy, like so:


Combine the flours and salt, dump it into the mixer and mix on low speed using the dough hook for about 10 minutes or so. Put it in a greased bowl, cover it and let it rise til it is doubled in size. Preheat the oven to 350!


Once the dough doubles, punch it down, turn it out onto a floured surface, and divide it into 12 equal balls, like so:


At this point, fill a pot up with water and put it on the stove to BOIL. Meanwhile, go back to your bagel balls, take each ball and punch a whole through its middle, so they look like this:


Cover them and let them rise a bit more. I was making everything bagels, so I got together what I wanted on the top. I used chopped fresh basil, sea salt, cracked pepper, rosemary, sesame seeds and some crushed red pepper:


Now for the fun part, dunking the bagels in scalding water! I think this is what makes them chewy, but I am no bagel expert.

At this point, the water should be boiling. Turn it off. Take the bagels 4 at a time (depending on how big your stock pot is) and drop them in the water. About 45 seconds on each side. Put them onto a baking sheet:


Now take the egg white and brush the tops of the bagels and dunk them in your toppings:


Slap them in the oven til they are golden brown, about 20 to 35 minutes, I can't say for sure cause I don't know how hot your oven runs. IF you want, you can flip them half way through.
Suddenly, you have BAGELS! Amazing, no??


I devoured 2 right then and there and they were DELISH.
I went to bed happy.

The next morning, a rare thing happened here in Norway, the sun came out!!! After months of darkness, I could feel my soul stirring in reaction to the rays of the sun. I knew the weather could change quickly, so with military precision, I orchestrated our first outdoor breakfast of the year. I was handing things to Christopher and shouting 'Go! Go! Go!'. Just kidding. I wasn't shouting that, but I really wanted to catch the sun while it was a-shinin'.

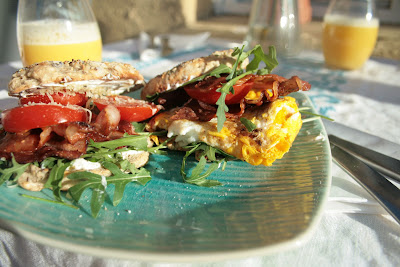
So, we set the table and the bagels performed so well! Here is what Christopher had for his sunny breakfast:


And here was mine:


So, we ate our bagels, soaking up the late winter sun, wrapped in scarves and coats, drank our hot coffee and enjoyed every minute of it!!

Now go make bagels!!!!